Advanced customization and integration
- Branding your platform: white-label WeSolve
- Customize the visual appearance
- Set-up custom domain
- Use custom authentication system
- Use custom email provider
- Integrating external authentication systems
- Configure external Google login
- Configure external Facebook login
- Configure external Microsoft login
- Configure external OpenId Connect login
- Expanding functionality with third-party integrations
- Setting up SMS notifications
- Personalizing design with custom CSS
Branding your platform: white-label WeSolve
Customize the visual appearance
Set-up custom domain
Use custom authentication system
Use custom email provider
Integrating external authentication systems
Configure external Google login
Integrating Google sign-in into your web application allows users to authenticate using their Google accounts.
1. Access Google Cloud Console
- Go to the Google Cloud Console.
- Log in with your Google account.
- Select or create a new project for the Google login functionality.
2. Configure the OAuth Consent Screen
- Navigate to APIs & Services > Credentials.
- Click on CONFIGURE CONSENT SCREEN.
- Select External for the User Type and click Create.
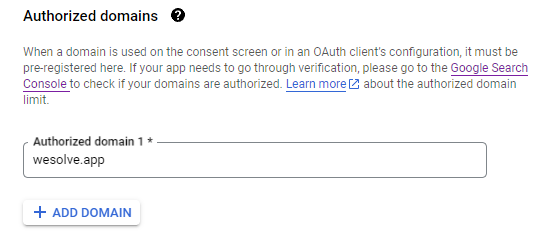
- Fill in the required fields on the OAuth consent screen tab:
- App name: "WeSolve"
- User support email: Choose an email for user support queries.
- Developer contact information: Provide your contact email.
- Add your web app's domain to the Authorized domains section (e.g.,
yourdomain.com).

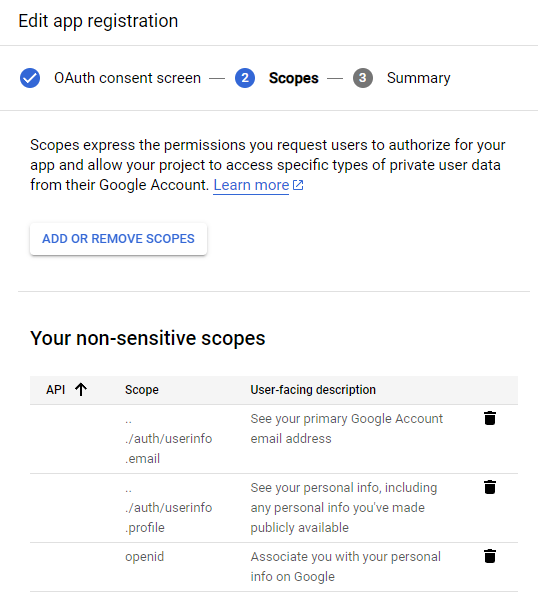
3. Add Scopes for the OAuth 2.0 Credentials
- Specify the scopes your application will need:
openid,email, andprofile. - These scopes enable access to the user's ID, email, and basic profile info.
4. Create OAuth 2.0 Credentials
- From the Credentials page, click Create Credentials > OAuth client ID.
- Select Web application as the application type.
- Under Authorized JavaScript origins, add your web app's base URL (e.g.,
https://yourdomain.com). - In Authorized redirect URIs, add the URI for redirecting after authentication (e.g.,
https://yourdomain.com/account/login). - Click Create to receive your client ID and client secret.
5. Setup WeSolve Google login configuration
-
Locate and select Administration from the left-side menu and select Settings to open the settings page.
-
Locate and select External Login Settings from the tabs menu.
-
Locate Google and check the box Enable to enable Google authentication.
-
Configure Google Parameters:
- Client ID: Enter the Client ID obtained in step 4.
- Client Secret: Enter the Client Secret obtained in step 4.
-
User Info Endpoint: Specify the URL for retrieving user information from Google APIs. We raccomend to use
https://www.googleapis.com/oauth2/v1/userinfo?alt=json
Configure external Facebook login
Integrating Facebook sign-in into your web application allows users to authenticate using their Facebook accounts.
1. Create a Facebook App
- Go to Meta for Developers and log in with your Facebook account.
- Navigate to My Apps > Create App.
- Choose For Everything Else as your app type.
- Enter your app details, such as name and contact email, then click Create App ID.
2. Configure Facebook Login
- Inside your app dashboard, find the Add a Product section and select Facebook Login > Set Up.
- Choose Web as the platform.
- Enter your site URL when prompted.
3. Specify OAuth Redirect URIs
4. Secure Your App
- Still in the Facebook Login settings, ensure you configure the Client OAuth Settings securely:
- Client OAuth Login: Enabled, allowing OAuth flows from client devices.
- Web OAuth Login: Enabled, allowing OAuth flows from web applications.
- Enforce HTTPS: Ensure this is enabled for secure OAuth redirects.
5. Set up WeSolve Settings
- Open the External Login Settings and change the following values:
- App ID: Insert the Meta application's App ID
- App secret: Insert the Meta application's App Secret
- Save changes.
Configure external Microsoft login
Integrating Microsoft Entra ID allows users to sign in to your application using their Microsoft accounts. Follow these steps to create an application in Azure, configure the necessary permissions, and obtain your Client ID and Client Secret.
1. Register a New Application in Azure Portal
- Go to the Azure Portal and sign in with your Microsoft account.
- Navigate to Azure Active Directory > App registrations > New registration.
- Enter a name for your application, e.g., "Your Organisation".
- Choose who can use the application. For most cases, select Accounts in this organizational directory only (Single tenant).
- Enter the Redirect URI (Web) where Azure AD will return OAuth responses. The redirect should corresponde to the base WeSolve application url, i.e.
https://yourdomain.com. - Click Register.
2. Configure Permissions
- Once your application is registered, go to your application's overview page.
- Navigate to API permissions > Add a permission > Microsoft Graph > Delegated permissions.
- Search and add the following permissions:
-
User.Read: Allows the app to read the profile of signed-in users. -
email: Allows access to the user's primary email address. -
openid: Allows sign-in and read user profile. -
profile: Allows access to the user's first name, last name, and picture.
-
- After adding these permissions, click Add permissions at the bottom.
3. Grant Admin Consent
- Still in the API permissions section, click Grant admin consent for {Your Organization}.
- Confirm by clicking Yes. This step requires admin privileges in your Azure AD organization.
4. Obtain Client ID and Client Secret
Client ID
- Your application's Client ID (also known as Application ID) can be found on the application's overview page in Azure Portal.
Client Secret
5. Use the Client ID and Client Secret in WeSolve
- In WeSolve Settings > External Login Settings > Microsoft, make sure Enable is checked and enter the Client ID and Client Secret you obtained from the Azure portal.
- These credentials will be used to authenticate with Microsoft Entra ID and to securely request access tokens.
Configure external OpenId Connect login
Integrating OpenID with WeSolve allows organizations to streamline user authentication, enhancing both security and user experience. This document guides administrators through the process of setting up external OpenID, detailing each step and explaining the technical concepts involved.
When the OpenID Connect is enabled, all other authentication mechanisms will not be visible in the login page and only the enabled OpenId provider will be used for authentication.
1. Accessing External Login Settings
-
Ensure you are logged into the WeSolve platform with your administrator credentials.
-
Locate and select Administration from the left-side menu and select Settings to open the settings page.
-
Locate and select External Login Settings from the tabs menu.
2. Enabling and Configuring OpenID Login
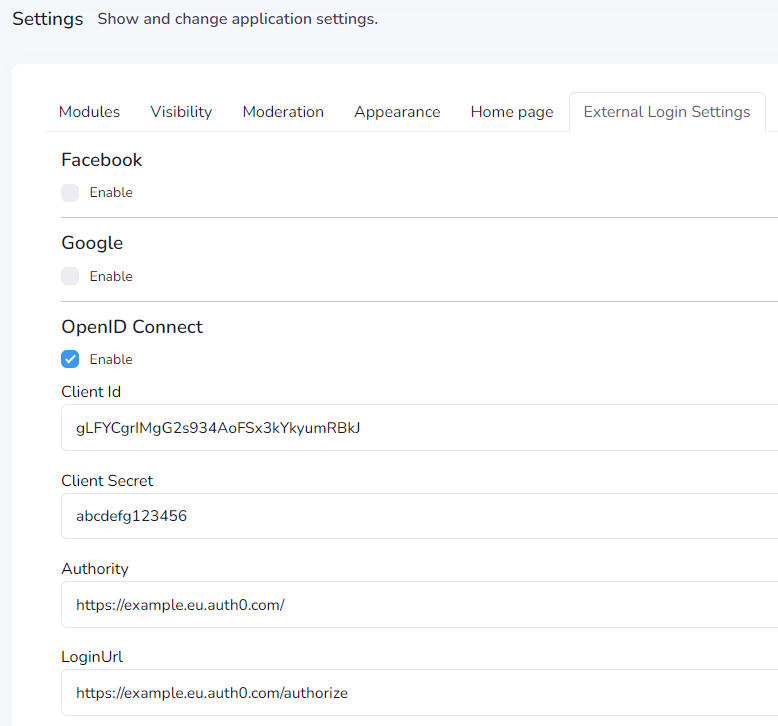
In the External Login Settings:
- Enable OpenID Login: Locate OpenID Connect and check the box Enable to enable OpenID authentication.
- Configure OpenID Parameters:
- Client ID: Enter the Client ID provided by your OpenID provider.
- Client Secret: Enter the Client Secret associated with your Client ID.
- Authority: Specify the URL of the OpenID provider.
- Login URL: Provide the login URL where users will be redirected for authentication.
- Validate Issuer: Ensure this is checked for added security, validating the identity of the issuer.
Make sure your OpenID provider can return the standard claims (openid, profile, email) as specified in OIDC specification: Standard Claims on openid.net
Setting up Claims Mapping
Claims are user attributes shared by the OpenID provider. WeSolve allows custom mapping of these claims to user attributes in your system.
You can map additional claims by specifying them in the format "standard_claim_name": "your_open_id_claim_name".
Examples of Integrating Popular OpenID Systems
Below are examples of how to integrate popular OpenID systems with WeSolve:
Integrating with Auth0
- Open the Settings of your Auth0 application
- In Application Properties set the Application Logo and the Application Type as
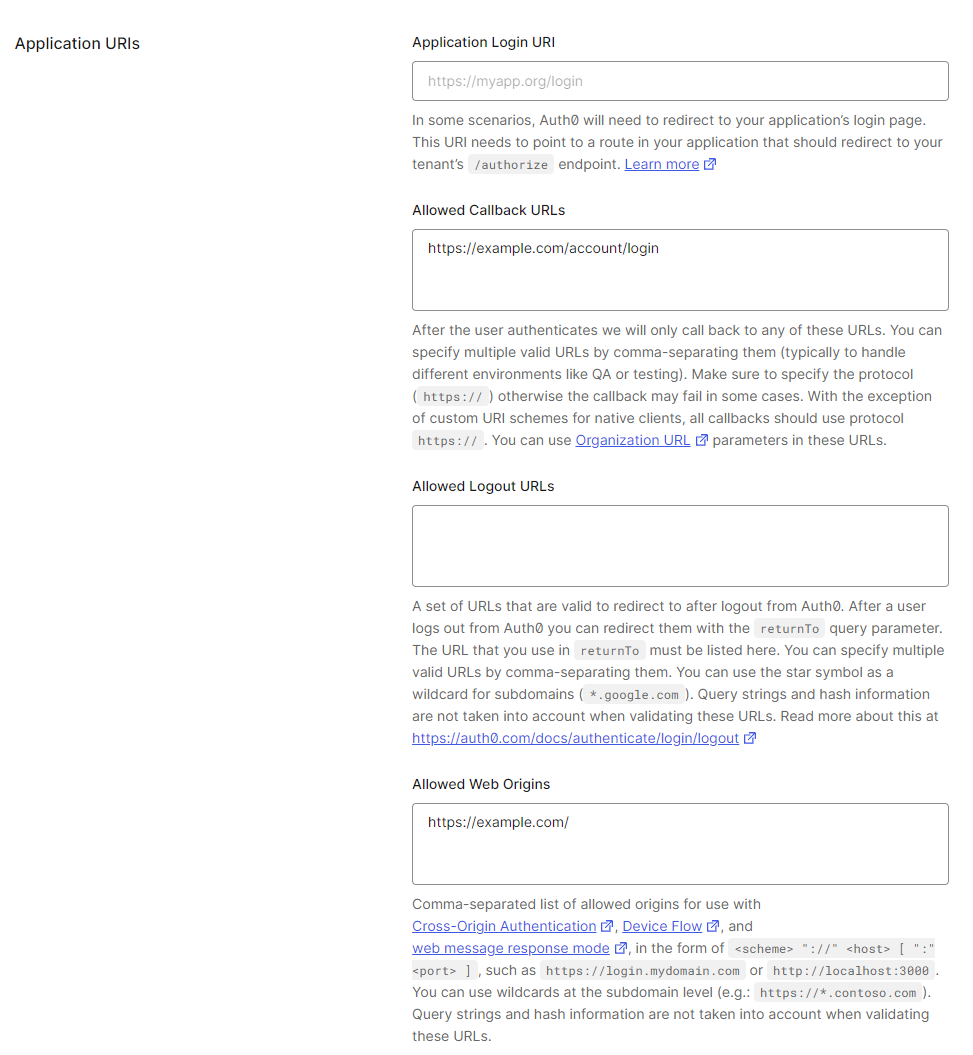
Single Page Application - In Application URIs, add the value
https://yourdomain.com/account/loginin Allowed Callback URLs - In Application URIs, add the value
https://yourdomain.com/in Allowed Web Origins

- Open the External Login Settings and change the following values:
- Client ID: Insert the Client ID defined in the section Basic information
- Client Secret: Insert the Client Secret defined in the section Basic information
-
Authority: Insert the Authority in the format
https://AUTH0_DOMAIN/, whereAUTH0_DOMAINis defined in the section Basic information -
Login URL: Insert the Login Url in the format
https://AUTH0_DOMAIN/authorize, whereAUTH0_DOMAINis defined in the section Basic information

Expanding functionality with third-party integrations
External integration through webhooks
Follow these steps to set up webhook subscriptions on the WeSolve platform. This feature allows you to receive real-time notifications of events within the platform directly to your specified endpoint.
Creating a Webook Subscription
-
Login as Admin
Begin by logging into the WeSolve platform with your admin credentials.
-
Navigate to Webhook Subscriptions
Once logged in, go to the
Administrationsection, and then selectWebhook Subscriptionsfrom the menu. -
Add New Webhook Subscription
In the top right corner of the Webhook Subscriptions page, click the
Add new webhook subscriptionbutton to create a new subscription. -
Specify the Webhook Endpoint
Enter the URL of the webhook endpoint where you want to receive notifications.
-
Select Webhook Events
In the
Webhook Eventssection, choose the specific events you wish to subscribe to. This determines which actions within WeSolve will trigger notifications to your endpoint. -
Specify Additional Webhook Headers
If needed, you can add extra headers to the webhook requests. In the
Additional Webhook Headerssection, specify any optional header keys and values. This is useful for adding authentication tokens or specifying content types. Adding extra headers can be crucial for ensuring the security of the data transmitted to your endpoint and for making sure the data format is recognized by your server. -
Save
After configuring your webhook subscription, click the
savebutton to activate it.
Viewing a Webhook Subscription
After adding your webhook, you can view and manage it in the Administration and Webhook Subscriptions page. Here, you'll see a list of all configured webhooks.
Clicking on Details next to any subscription allows you to view its specifics, including all attempts to send data. This includes the type of event, event time, response HTTP code, response data, and the data sent to the endpoint.
This setup ensures you are kept up-to-date with the activities within the WeSolve platform, enabling efficient and responsive management of citizen engagement initiatives.