Configure external OpenId Connect login
Integrating OpenID with WeSolve allows organizations to streamline user authentication, enhancing both security and user experience. This document guides administrators through the process of setting up external OpenID, detailing each step and explaining the technical concepts involved.
When the OpenID Connect is enabled, all other authentication mechanisms will not be visible in the login page and only the enabled OpenId provider will be used for authentication.
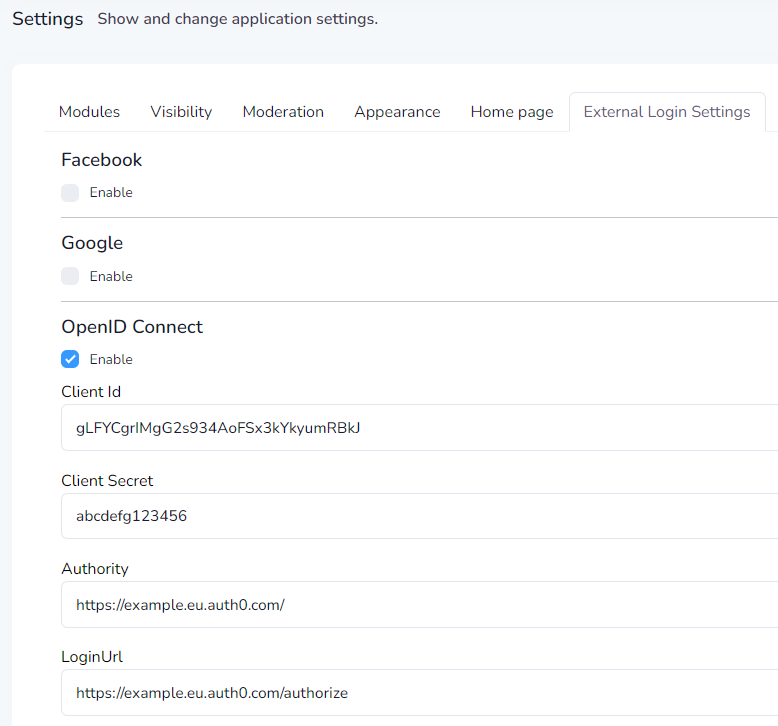
1. Accessing External Login Settings
-
Ensure you are logged into the WeSolve platform with your administrator credentials.
-
Locate and select Administration from the left-side menu and select Settings to open the settings page.
-
Locate and select External Login Settings from the tabs menu.
2. Enabling and Configuring OpenID Login
In the External Login Settings:
- Enable OpenID Login: Locate OpenID Connect and check the box Enable to enable OpenID authentication.
- Configure OpenID Parameters:
- Client ID: Enter the Client ID provided by your OpenID provider.
- Client Secret: Enter the Client Secret associated with your Client ID.
- Authority: Specify the URL of the OpenID provider.
- Login URL: Provide the login URL where users will be redirected for authentication.
- Validate Issuer: Ensure this is checked for added security, validating the identity of the issuer.
Make sure your OpenID provider can return the standard claims (openid, profile, email) as specified in OIDC specification: Standard Claims on openid.net
Setting up Claims Mapping
Claims are user attributes shared by the OpenID provider. WeSolve allows custom mapping of these claims to user attributes in your system.
You can map additional claims by specifying them in the format "standard_claim_name": "your_open_id_claim_name".
Examples of Integrating Popular OpenID Systems
Below are examples of how to integrate popular OpenID systems with WeSolve:
Example: Integrating with Auth0
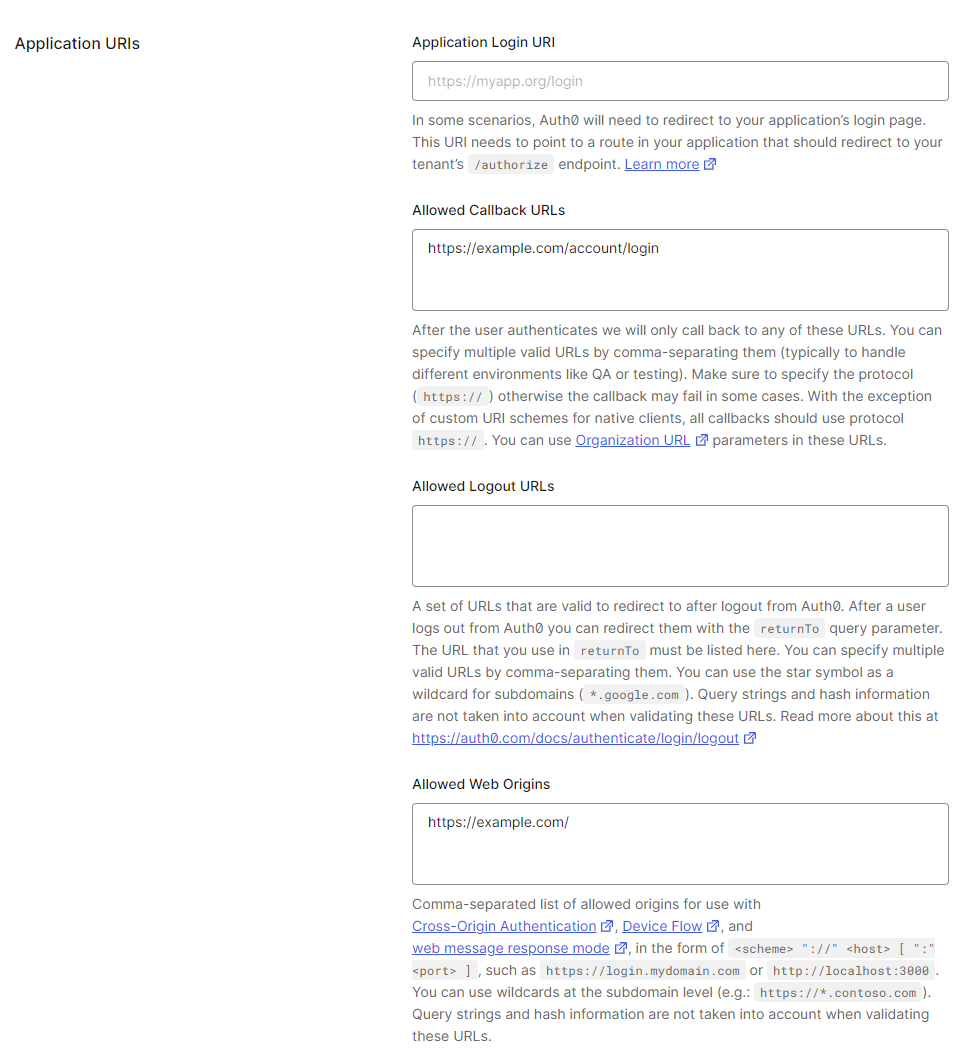
- Open the Settings of your Auth0 application
- In Application Properties set the Application Logo and the Application Type as
Single Page Application - In Application URIs, add the value
https://YOUR_WESOLVE_WEB_APP_DOMAIN/account/loginin Allowed Callback URLs, where YOUR_WESOLVE_WEB_APP_DOMAIN is the domain associated to your WeSolve web app instance - In Application URIs, add the value
https://YOUR_WESOLVE_WEB_APP_DOMAIN/in Allowed Web Origins, where YOUR_WESOLVE_WEB_APP_DOMAIN is the domain associated to your WeSolve web app instance
- Open the External Login Settings and change the following values:
- Client ID: Insert the Client ID defined in the section Basic information
- Client Secret: Insert the Client Secret defined in the section Basic information
-
Authority: Insert the Authority in the format
https://AUTH0_DOMAIN/, whereAUTH0_DOMAINis defined in the section Basic information -
Login URL: Insert the Login Url in the format
https://AUTH0_DOMAIN/authorize, whereAUTH0_DOMAINis defined in the section Basic information